Paper Marbling for Bookbinding: Adding Unique Covers
Elevate your bookbinding projects with hand-marbled paper covers! This tutorial shows you how to create stunning, one-of-a-kind books.
Bookbinding and paper marbling – a match made in creative heaven. While traditional bookbinding often emphasizes clean lines and structured precision, adding a hand-marbled paper cover introduces an element of unexpected beauty and artistry. It transforms a functional object into a piece of art, each book cover unique and full of swirling color. This guide will walk you through the process of creating stunning, marbled paper specifically for bookbinding, from preparing the paper to applying it to your finished book block.
Understanding the Basics of Paper Marbling
Before we dive into bookbinding specifics, let's quickly recap the fundamentals of paper marbling. The core principle is to suspend pigments onto a thickened water bath (often called a “size”) and then transfer these pigments onto paper. There are several marbling techniques, but we're focusing on those suitable for large sheets needed for book covers.
Key Materials You'll Need:
- Methyl Cellulose or Carageenan: These are the thickening agents for your marbling size. Methyl cellulose is generally easier for beginners.
- Pigments: Acrylic paints are a popular choice due to their vibrancy and ease of use. Traditional marbling uses pigments like ox gall and natural dyes, but acrylics offer more consistent results for beginners.
- Mordant: This helps the pigment adhere to the paper. Acrylic paint acts as a mordant in this case.
- Paper: Sizing the paper properly is crucial. We're looking for strong, absorbent paper. Watercolor paper or printmaking paper (around 70-100 lb weight) is a good starting point. Larger sizes (at least 11x14 inches) are needed for larger books.
- Marbling Tray: A shallow, wide tray to hold your size.
- Droppers or Pipettes: For precise pigment application.
- Rake or Comb: For creating patterns.
- Large Sponge or Rag: For blotting excess size.

Preparing Your Paper for Marbling
Proper paper preparation is absolutely essential. We need to ensure the paper is sized adequately to prevent the pigments from bleeding. Since we'll be using acrylic paints as both pigments and mordants, the process is relatively straightforward. However, there are still steps to take.
Sizing Your Paper:
- Pre-Sizing (Optional but Recommended): While acrylic paint will act as a mordant, pre-sizing your paper with a thin coat of diluted PVA glue (white glue) can improve the paper's strength and reduce feathering. Allow to dry completely.
- Acrylic Mordanting: Apply a very thin, even coat of acrylic paint (any color will do, but a light tint is best) across the entire surface of the paper. You can use a sponge or a large brush for this. Less is more – we don’t want the paper to be saturated.
- Drying: Allow the acrylic coating to dry *completely*. This is vital! It can take several hours, or even overnight. The paper should feel slightly tacky but not wet.
The Marbling Process – Creating Your Covers
Now for the fun part! Let’s walk through the marbling process itself. Remember, practice makes perfect, so don't be discouraged if your first attempts aren't exactly what you envisioned.
Setting Up Your Size:
- Mixing the Size: Follow the instructions on your methyl cellulose or carageenan package to prepare the size. Generally, you'll be mixing the powder with water until you achieve a consistency similar to thin cream.
- Adding the Pigments: This is where creativity comes into play! Use droppers or pipettes to carefully add drops of your chosen pigments onto the surface of the size. Experiment with color combinations and patterns.
Creating Patterns:
Once you've added your pigments, you can use tools to create patterns. Here are a few simple techniques:
- Raking: Use a rake or comb to drag the pigments across the surface, creating swirling lines.
- Spattering: Gently tap the tray with a brush to create a scattered, speckled effect.
- Stone Patterns: Use a small, smooth stone to swirl the pigments in a circular motion, creating "stone" like patterns.
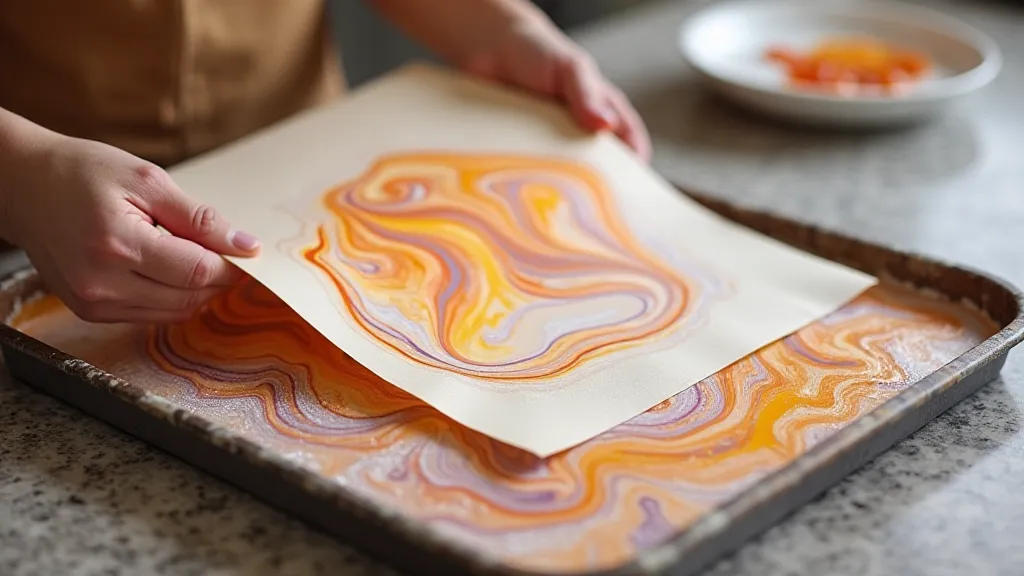
Transferring the Pattern to Paper:
- Blotting: Gently lay the paper onto the surface of the size.
- Lifting: Carefully lift the paper straight up, allowing the excess size to drip back into the tray.
- Blotting Again: Gently blot the back of the paper with a sponge or rag to remove any remaining size.
- Drying: Hang the paper to dry completely. This can take several hours or overnight.
Preparing Your Marbled Paper for Bookbinding
Once your paper is dry, there are a few finishing touches needed before it's ready for bookbinding.
Flattening:
Marbled paper can often curl during the drying process. To flatten it, place it between two heavy, flat surfaces (like books or boards) and weigh them down for a few days.
Trimming:
Trim the edges of the paper to create clean, straight edges. The size of your marbled paper should correspond to the size of your book cover. Remember to account for any overhang needed for the spine.
Applying Your Marbled Paper to the Book Cover
There are several methods for attaching your marbled paper to the book cover. The simplest method is to adhere the marbled paper to a pre-made cover board.
Adhering the Paper:
- Applying Adhesive: Apply a thin, even layer of bookbinding glue or PVA glue to the surface of the cover board.
- Positioning the Paper: Carefully position the marbled paper onto the glued surface, ensuring it's centered and aligned correctly.
- Smoothing the Paper: Use a bone folder or a similar tool to smooth out any air bubbles or wrinkles in the paper.
- Drying: Allow the glue to dry completely under a weight.

Conclusion
Adding hand-marbled paper to your bookbinding projects is a wonderfully rewarding experience. It’s a process that combines artistic expression with functional craftsmanship. Embrace the imperfections, experiment with colors and patterns, and enjoy the unique beauty of your one-of-a-kind books!